Hydroponic Ebb and Flow System
The ebb and flow system is one of the easiest methods available to hydroponically grow fruits and vegetables.
I assure you that once you try these methods you’ll be very happy with the results.

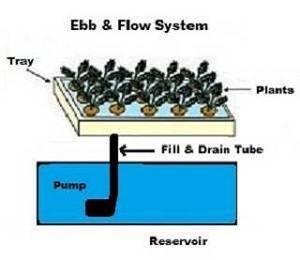
The ebb and flow system works by placing the plants into a container (tray or bucket) and flooding the container and the root system with nutrient solution.
Flooding the tray is done with a timer that can be set at intervals of anywhere from 4hrs to 24 hrs depending on the size and needs of the plant.
This is a very simple concept that has provided many growers with incredible results. Because this method is so simple I will not consider the ebb and flow system to be an advanced method.
But because of the outstanding results, I would definitely consider the ebb and flow system to be a superior method of growing fruits and vegetables.
What can go wrong with the ebb and flow system?
The only problems that I have ever encountered with ebb and flow are”connection” problems.
By this I mean that on rare occasions a connection will come loose and cause a leak in the system.
But this is usually because I accidentally kicked it or I didn’t connect it right to begin with. In other words, “operator error” was usually the cause.
As long as you sit and watch the container flood and drain yourself the first time without any errors, then you shouldn’t have any problems after that.
So let’s look at a some of the ebb and flow systems that will give you the results you desire.
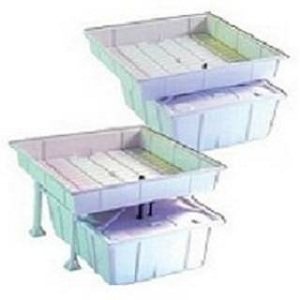
Method #1 Tray Ebb and Flow System

Supplies:
drill
water pump
1 3/8in drill bit
black vinyl tubing
tray
digital timer
1-2 ebb and flow fittings
clay pellets
air tubing
air stone
rockwool blocks
air pump
rockwool cover
reservoir
reservoir cover
4-6 5gal buckets
2 8ft 2×4′s
Step by Step
Step 1)
Drill a 1 3/8in hole into one end of the tray you plan to use for the system. I have seen setups where 2 holes are made so that the water can flow into one end and then drain through the other end. I find this to be unnecessary. Using one hole to for the flood and drain has always worked great for me.
Step 2)
Insert the outlet fitting and set the tray up on some 2×4’s and a few 5-gal buckets. You can set-up a few trays next to each other and connect them all together on the same water pump as long as you have enough water in the reservoir.
Step 3)
Measure and cut the length of tubing you will need to connect the outlet fitting/s to the water pump.
Step 4)
Connect the tray or trays to the water pump and place the pump inside the reservoir.
Step 5)
Connect the air stone to the air pump and place the air stone into the reservoir with the water pump.
Step 6)
Fill the reservoir with nutrient solution and plug in the air pump.
Step 7)
Set the timer and plug in the water pump.
Step 8)
Fill tray with clay rocks to cover the roots and keep them from being exposed to the light.
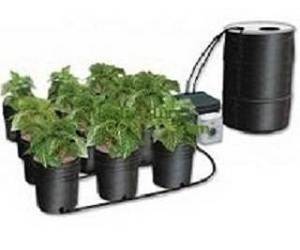
Method #2 The ebb and flow bucket system

This is probably my favorite ebb and flow system to use.
I have used this ebb and flow system many times in the past with great results. If you can afford it, I think you’ll enjoy using this system as much as I do.
Supplies:
controller
2 55gal reservoirs
tee fittings
elbow fittings
air pump
black vinyl tubing
air tubing
air stone
2gal buckets
2 “release valves”
2 water pumps 1 Comes w/controller
clay pellets and/or
bulk rockwool
Step by Step
Step 1)
Connect the “outside” buckets with the appropriate fittings and space them out into their positions on the floor.
Step 2)
Connect the buckets with 1/2in tubing all the way back to the “brain”.
Step 3)
Use 1/2in tubing to connect the 1st water pump in the brain to reach the bottom of the reservoir with about 1-2ft extra.
Step 4)
Set the 1st release valve in place over the edge just inside the reservoir so the water will drain back in.
Step 5)
Place the 2nd water pump into the reservoir and connect that pump to the inlet fitting on the brain with 1/2in tubing.
Step 6)
Set the 2nd release valve on that tubing right next to the 1st release valve just inside the reservoir.
Step 7)
Fill your “inside” buckets with the appropriate medium and set them into their “outside” buckets.
Step 8)
Fill the reservoir with nutrient solution. I usually use 2 reservoirs and take turns with each one when I need to change the water.
Step 9)
Connect the air stone to the air pump and place the air stone into the reservoir with the water pump.
Step 10)
Plug in the brain and air pump and set the timer located on the brain.
Keys to Success
With ebb and flow system I like to use rockwool blocks to place the plants into.
With the tray system, the water level only needs to go about half way up the rock wool cube.
If you go any higher then you will risk making the plants float and then fall over. So set the timer accordingly.
Leaving the top of the rock wool cube exposed to the light will cause algae to build up on the rockwool. You can correct this by placing a cover on the cube to block the light.
With the bucket method, the rockwool cube will be placed about a third of the way inside the bucket and covered with medium.
I suggest making sure that the water level reaches at least half way up the rockwool cube.
If you want to save money with the tray method, then I would suggest going to Wal-Mart or Target and finding trays there.
I have used these trays in the past with great success.
Another option to save money with the bucket system is to go to Home Depot and buy 45gal trash cans and use them as reservoirs.
You can also buy the 2gal white paint buckets and use them as your containers. You will of course, have to drill all the holes yourself.
The key to making this method work will be watching the timer go off as planned and making sure the system does not fail.
With the ebb and flow system if all goes well after the first couple of times, then you can be pretty sure that you did everything right.